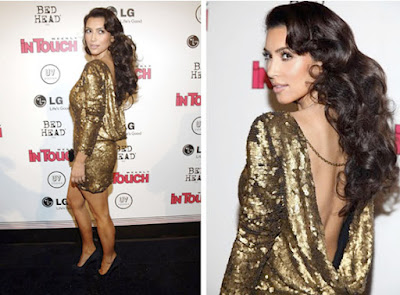
Most of you may not realize this but… I wear hair extensions! Lol, this is NOT my real hair. I receive many compliments on my weaves and have come to share my expertise with the masses. Too many times I have seen a beautiful girl with a hawt outfit on and her hair is all the way JACKED. I do not want this to be you ladies. Here is a step by step guide of perfecting your extensions; take note of these tips and you’ll have a Kim Kardashian weave in no time!
Step 1: Your Natural Hair
Many women focus so much on the weave itself that they neglect their own hair. No matter how much money you spend on a weave it is NOT your own and will eventually be thrown away. Your real hair is with you for life so please please maintain it. Keeping your split ends cut and getting a deep condition every two weeks will make a tremendous difference. That way when you remove the weave your hair will have grown underneath. I use:
- Mizani Thermasmooth Shampoo $22.50
- Mizani Moisturefuse Conditioner $26.99
- Mizani Thermasmooth Guard Serum $13.00
Step 2: To Glue or to Sew?
OK, let me start off by saying I am partial to a sew in. Not only do they last longer, they are better for your hair. Although sew ins are more costly and time consuming. If you want a style that is more cost-efficient and that involves less maintenance, then a quick weave or hair bonding (gluing the track to your scalp) is for you. If you must go the quick weave route make sure your stylist applies the cap properly or you will have hair loss around your edges.
Step 3: Who Will Do Your Hair?
This step is solely up to the person. I get my hair done professionally just because I am a perfectionist (and lazy), but there are plenty of girls around the way who will hook you up in their kitchen for $30! Let's weigh the pros and cons shall we?
PROS
- If you are going to spend $150+ on the hair why scrimp on the application? After two months the hair will still be lush but the braids will be reaching to the back of your head!
- I love going to a professional because I don't have to do anything but bring the hair and her cash! She deep conditions my hair for me, trims it, does an EXTRA leave in conditioner; it is very hassle free and I love it.
- I am also a control freak, when I want something done, I want it done right then. The problem I have sometimes with stylists who do hair from their home is that they can be unreliable. I do not have time to call you all day to do my hair. At a salon you have the luxury of making an appointment to tailor your own convenience.
Cons
- There is no denying a sew in is expensive and a professional one will run you about $125+, that is pretty steep when your homegirl will only charge you $30-$50.
Step 4: The Hair
You should always think about what is most practical for your lifestyle. If you are a frugalista stay within the $30-$50 range for your hair. You can still achieve a pretty look just don't expect this hair to look as lush as an $80+ bag of hair. I'd also advise you to seek out a cheap stylist. Why spend a ton for the application when the hair won't outlast it? Here are some options for the high and low end:
Inexpensive Yaki Weave, all %100 Human Hair
- Bobbi Boss, $35+ depending on color and length
- Premium Too $20+ depending on color and length
- Model Model $10+ depending on color and length
Remy Hair
- Hollywood Remi Human Hair Weave $75+ depending on color and length
- Bobbi Boss Indi Remi $85+ depending on color and length
- Outre Velvet Remi Human Hair $60+ depending on cut and length
Step 4: Length
Whether you plan to rock a bob or a long Beyonce weave, remember to be practical. For beginners I'd say 10'' to 12'' is perfect, for my glam girls 14'' to 18''. Over 18'' is doable just try not to look costume-y, especially if you will just be going to class, work etc. I usually buy 14'', then when I get bored I get it cut into a long bob.
Step 5: Color
A great weave can be ruined by the wrong shade, have a friend go with you to the beauty supply to give an honest opinion. Also I am not a fan of weave with the pre-made highlights, it can sometimes look tacky. My natural color is more of a 2 (Brown) but I wear a 1 (Jet Black). Remember, the more hair has been processed (for example blonde weave) the more money you will have to spend on a quality bag.
Step 6: How Many Bags Should You Buy?
This step depends on the style, if you are leaving majority of your natural hair out you may only need one bag. For all full sew in (no hair is left out) two bags for sure. Note that cheaper hair is usually thinner, you may need three bags to achieve your look.
Step 7: The Cut
Skip this step at your own peril! I can ALWAYS tell when someone cut their own hair, even if it looks decent it just doesn't fall like a professional cut. A proper cut will make your hair look more natural and you'll feel more confident in your style as well. This is especially true for bobs, LEAVE THE CUTTING TO A PROFESSIONAL!
Step 8: Maintaining Your New 'Do
As you can see, weave is a lot of work! And after your style is over the work is still not done. I get my sew in deep conditioned every two weeks, this has extended the style by an extra month and counting. Take care of your weave and the weave will take care of you! Tips:
- Always sleep with a bonnet or silk scarf on at night.
- Do not weigh the hair down with product, a little sheen every other week will do the job.
- Keep the flat irons to a minimum to reduce kinks, hot rollers are a great alternative.
Extra Tips
- No lace front wigs... EVER. Do NOT do it!
- If you must leave your natural hair out make sure your hair texture matches the weave.
- Check the weft of the extensions. The tighter the weft, the less the hair will shed.
 |
| GOOD WEAVE :)) |
 |
BAD WEAVE! :((
|
Well that’s all folks! I love weave lol as you can tell. Try some new styles and leave me lots of comments. Remember make fashion simple, and then add a touch of glam. Peace!
Email me at amg030@shsu.edu and follow me on Twitter @AshleySoBougie


